
Creating a Sunny Home Manager System in Sunny Portal
Sunny Portal is used as the user interface of the Sunny Home Manager. In general and in this document, systems equipped with a Sunny Home Manager are referred to as a "Sunny Home Manager system."
To create a Sunny Home Manager system for the first time or a new one, you must use the system setup assistant of Sunny Portal at www.sunnyportal.com/register.
The system setup assistant will guide you through all further steps:
User registration
Registration of the Sunny Home Manager system
System properties such as the system name and password
Registration and identification of the Sunny Home Manager
Configuration of the energy meter
Extended system properties such as the nominal system power, location, annual yield, feed-in tariffs, and more.
In the User Information column, the system setup assistant provides helpful background information and other information for all entries.

Even if you already have a PV system in which you want to integrate a Sunny Home Manager, you have to create a new system.
Only after the Sunny Home Manager has been registered, can other devices in the system be detected or further devices integrated.
In order to be able to transfer the devices of the previous system to the new Sunny Home Manager system, you must first deactivate these devices (usually at least 1 inverter) in the old system. Then you can add the devices to the new system.
The procedure for adding or replacing devices is described under Configuration > Device overview > Overview of new devices.
Requirements:
The PV system and all devices in the local network must be in operation and connected to the Sunny Home Manager via a router.
The registration ID (RID) and the identification key (PIC) from the Sunny Home Manager must be available. The information can be found on the type label that is attached on the side of the product as well as on the label provided.
The status LED must glow green and the performance LED must be off on the Sunny Home Manager.
In order to be able to display PV generation and consumption in your household, energy meters for the measurement of the power- and energy values must be connected. By default, the Sunny Home Manager fulfills this requirement.
Procedure:
- Start the web browser and go to www.SunnyPortal.com/register.
- The system setup assistant opens and guides you through all the steps.
- Click on [Next].
- The page User registration opens.
- Activate the field I am not yet registered and click on [Next].
- Enter the necessary data for registration.
- Click on [Next].
- After a few minutes you will receive an e-mail containing a link and your access data to Sunny Portal.
- Follow the link in the confirmation e-mail within 24 hours.
- Sunny Portal opens a separate window to confirm successful registration.
- Click on [Next].
- Enable the option Create a new PV system and enter the required information in the text field PV system properties.
- In the field PV system name enter a name for your system. (In this document, the PV system is called Sunny Home Manager system.)
- Enter a PC system password in the field Password ( > Required Passwords).
The system password applies for all devices of a system connected via Speedwire and is the same as the device password for the user group Installer.
- If the standard password 1111 is still set on all devices for the user group Installer, enter a new system password.
- If a different uniform password has already been set on all devices, enter this password as the system password.
- If a uniform password has not been set on all devices, set a uniform password for the user group Installer and enter this password in the system setup assistant as the system password. - Enter the system password again in the field Repeat password.
Tip: Be sure to keep note of this system password. You will need it frequently! - Click on [Next].
- On the page Select devices enter the identification key (PIC) and the registration ID (RID) of the Sunny Home Manager in the fields PIC and RID.
- Click on [Identify].
- The match between the entered data and the connected device is checked and the detected device is displayed.
- Click on [Next].
- The Sunny Home Manager now searches for devices in the local network. After a maximum of 10 minutes the system setup assistant lists the serial numbers of any available devices in the local network.
- Click on [Add] to add the devices to the Sunny Home Manager system immediately.
- The system password is transferred to the devices. This process can take several minutes. The devices are then shown with a green tick.
- Click on [Next].
- On the Meter configuration page, select the required meter depending on the installation in your house. By default, the integrated meter of the Sunny Home Manager is used as a grid-supply and feed-in meter and the internal measurement of the connected SMA inverters is used for PV generation. Therefore, no additional meter is required.
- Select the entry Internal Energy Meter in the Purchased Electricity and Grid feed-in dropdown-list.
- Select the entry No energy meter in the PV Generation drop-down list.
If inverters from other manufacturers are also installed in the PV system, an Energy Meter must be inserted between them. Only in this case you must select the entry SMA Energy Meter xxx in the drop-down list. Here, xxx is the placeholder for the SMA Energy Meter serial number. If there are several SMA Energy Meters in the PV system, select the required SMA Energy Meter. The generation power of the PV and hybrid inverters is only measured via this selected energy meter. This means that any combination of PV and hybrid inverters can be used. - Click on [Next].
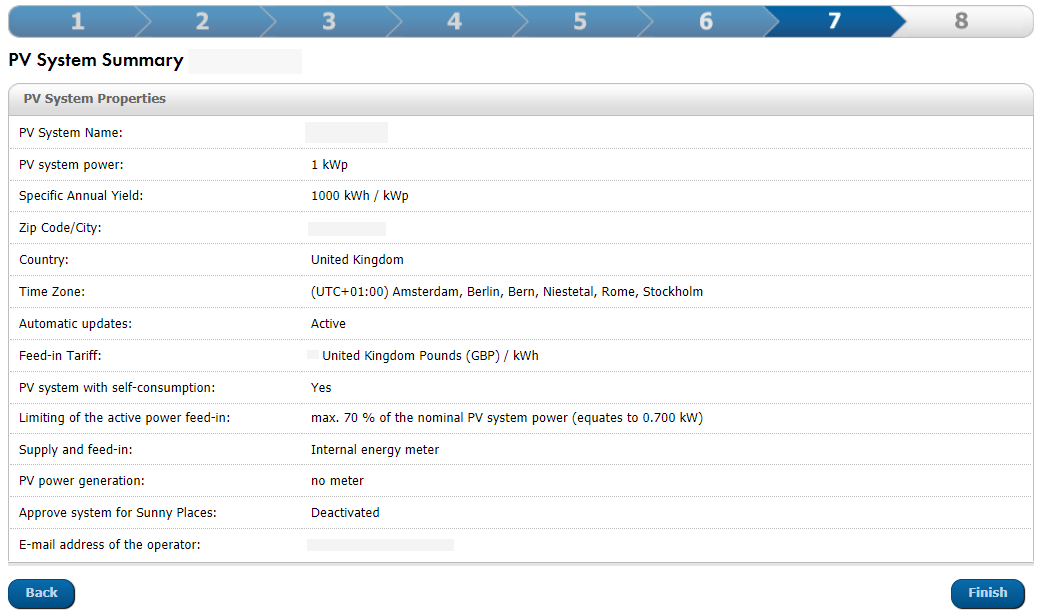
- On the page Extended PV system properties enter your PV system data:
- Enter the Nominal system power.
You can obtain the nominal system power from your installer. - Enter the Specific annual yield.
You can obtain the specific annual yield for your system location from irradiation maps. - Enter the data for the location of the system.
- Enter the Feed-in tariff if applicable.
The feed-in tariff is given to you by your local network provider. - If you want to consume the energy produced by your system yourself, to switch loads for example, you have to answer the question of Self-consumption with Yes.
- At Limiting of the active power feed-in, select the required option and make the required settings.
The limitation of the active power feed-in may have to be set according to the specifications of your grid operator. - Set Automatic updates: the automatic updates must be activated to ensure smooth communication within the system.
- Enter the E-mail address of the operator.
- Click on [Next].
- The system setup assistant shows a summary of your entered data. You have the possibility to check your information and correct it if necessary.
- If all the information is correct, click on [Finish].
- The basic configuration is completed.
- Sunny Portal will confirm on the next page that your system registration was successful.
A message also appears indicating that communication monitoring has been activated and that you will receive a daily report by e-mail every day. - To go to the Sunny Home Manager system, click on [To the PV system].
- The user interface of your system opens.
Entries for setting up a system (example)