
Connecting the AC Cable
 Qualified person
Requirements:
The connection requirements of the grid operator must be met.
The grid voltage must be within the permissible range. The exact operating range of the inverter is specified in the operating parameters.
Required material (not included in the scope of delivery):
Protective grease (only for conductors made of aluminum)
4 heat-shrink tubings
4 ring terminal lugs with hole diameter 12 mm (for conductors made of aluminum bimetal terminal lugs made of aluminum and copper)
Procedure:
- Disconnect the AC miniature circuit breaker from all 3 line conductors and secure against reconnection.
- Make sure that all 4 DC load-break switches have been switched off and secured against reconnection.
- Open the cable compartment ( > Opening the Cable Compartment).
- Dismantle the AC cable by no more than 375 mm.
If the optional AC sealing plate is used, dismantle all 4 cables by no more than 375 mm. - Strip off the insulation of L1, L2, L3 and the grounding conductor by 30 mm each.
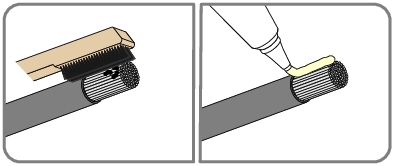
- For conductors made of aluminum, remove the oxide film and apply protective grease to the conductors.
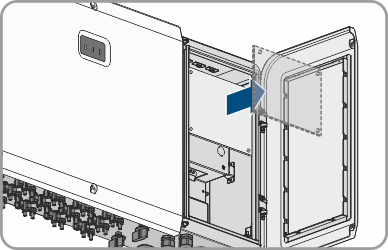
- Loosen the 4 screws of the protective cover in front of the AC connection (PH2) and remove the protective cover.
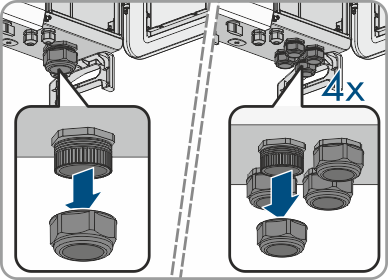
- Loosen the swivel nut of the cable gland for the AC connection on the bottom of the inverter.
Loosen all 4 swivel nuts when using the optional AC sealing plate. - Remove the additional seal insert of the cable gland of the AC terminal when using cables with a diameter ≥ 47 mm. Lead the cable through the swivel nut and the cable gland into the device.
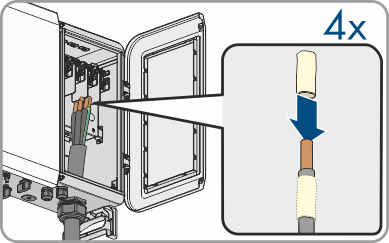
When using the optional AC sealing plate with a cable diameter of ≥ 22 mm, remove the additional sealing inserts of the cable glands. Feed the 4 cables through 1 swivel nut and 1 cable gland each into the device. - Pull 1 heat-shrink tubing each over conductors L1, L2, L3 and the grounding conductor. The heat-shrink tubing must be below the stripped conductor section.
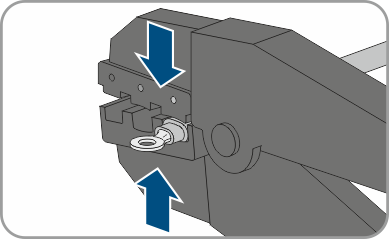
- Insert the stripped conductor section into the ring terminal lugs and crimp using a crimping tool.
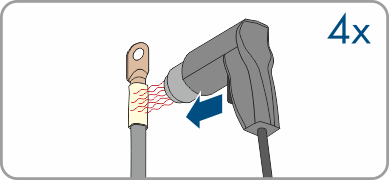
- Pull the heat-shrink tubings onto the crimped section of the ring terminal lugs and using a hot-air blower shrink them so that they are in firm contact with the ring terminal lugs.
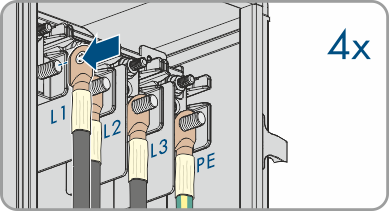
- Hook the conductors with the ring terminal lugs as labeled for L1, L2, L3 and the grounding conductor onto the threads at the top of the cable compartment.
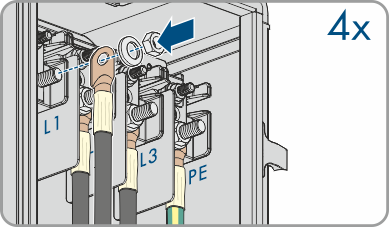
- Install 1 washer each and tighten the hex nut using a ratchet (AF19, torque: 20 to 30 Nm).
- Tighten the swivel nut to the cable gland of the AC connection (SW83, torque: 15 Nm to 19 Nm). Ensure that the AC cable is not under tension.
Tighten all 4 swivel nuts when using the optional AC sealing plate (SW53, torque: 10 Nm to 13 Nm). Ensure that the AC cables are not under tension. - Attach the protective cover in front of the AC connection using the 4 screws (PH2, torque: 1.5 Nm).
- Move the limiting lever back to its original position and close the cable compartment cover.
- Tighten the two screws on the cable compartment cover (TX30, tightening torque: 4.3 Nm).


Also see: