Mounting the Sunny Island
 Qualified person
CAUTION
Risk of injury due to weight of product
Injuries may result if the product is lifted incorrectly or dropped while being transported or mounted.
- Transport and lift the product carefully. Take the weight of the product into account.
- Wear suitable personal protective equipment for all work on the product.

Mounting Sunny Island devices with multicluster communication
The multicluster data modules are installed in the master at the factory if multicluster communication has been ordered. The master can be identified by the labeling on the packaging.
- With multicluster systems, mount the Sunny Island devices with installed multicluster data modules at the mounting location planned for master devices.
Additionally required mounting material (not included in the scope of delivery):
At least two screws that are suitable for the foundation
At least two washers that are suitable for the screws
At least two screw anchors that are suitable for the support surface and the screws
If the inverter is to be secured against theft, two security screws that can only be unscrewed with a special tool.
Procedure:
- Ensure that no lines are laid in the wall which could be damaged when drilling holes.
- Mark the position of the drill holes using the wall mounting bracket. Use at least one hole on the right-hand and left-hand side in the wall mounting bracket.
- Drill the holes and insert the screw anchors.
- Secure the wall mounting bracket horizontally on the wall using screws and washers.
- If the Sunny Island is to be secured against theft, mark the drill holes for the anti-theft device. Use at least one hole on the right and one on the left.
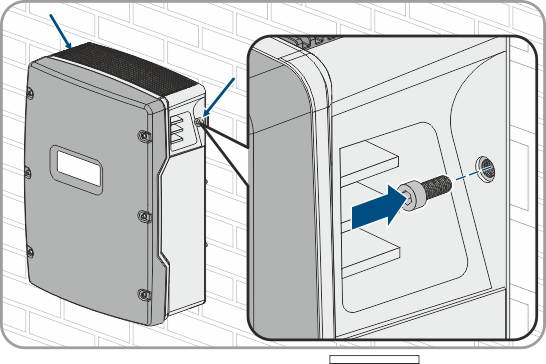
- Mount the SI4.4M-12 to the wall mounting bracket. For this, use the side recess grips. Keep the Sunny Island in a horizontal position when moving it.
- Mount the SI6.0H-12 and SI8.0H-12 to the wall mounting bracket. For this, use the side recess grips or a steel rod (diameter: maximum 30 mm). Keep the Sunny Island in a horizontal position when moving it.
- Use an Allen key (AF 5) to attach the Sunny Island to the wall mounting bracket on both sides with the M6x10 screws provided (torque: 4 Nm to 5.7 Nm). This will prevent the Sunny Island from being lifted off the bracket.
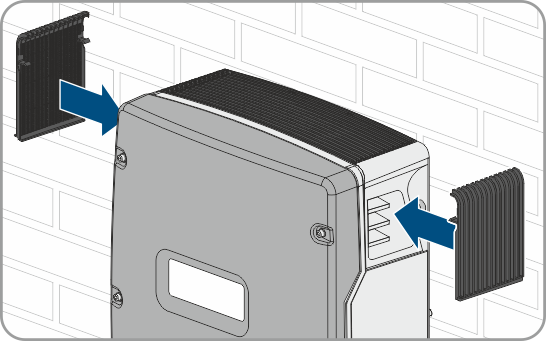
- Close the recessed grips with the ventilation grids. Place the ventilation grid marked links/left on the left recessed grip and the ventilation grid marked rechts/right on the right recessed grip.
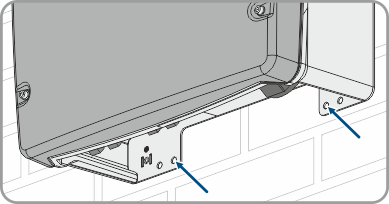
- In order to protect the Sunny Island against theft, attach the bottom side to the wall with two security screws.
- Ensure that the Sunny Island is firmly attached.
CAUTION
Risk of injury due to damaged cables
There may be power cables or other supply lines (e.g. gas or water) routed in the wall.