Opening and Closing the Inverter
 Qualified person
If you have to open the inverter enclosure lid for repairs or replacement, proceed as described in the following.
 DANGER
Danger to life due to electric shock when live components or cables are touched
High voltages are present in the conductive components or cables of the product. Touching live parts and cables results in death or lethal injuries due to electric shock.
- Do not touch non-insulated parts or cables.
- Disconnect the product from voltage sources and ensure it cannot be reconnected before working on the device.
- After disconnection, wait 15 minutes until the capacitors have discharged.
- Observe all safety information on components associated with the product.
- Wear suitable personal protective equipment for all work on the product.
NOTICE
Damage to the enclosure seal in subfreezing conditions
If you open the product when temperatures are below freezing, the enclosure seals can be damaged. Moisture can penetrate the product and damage it.
- Only open the product if the ambient temperature is not below -5°C.
- If a layer of ice has formed on the enclosure seal when temperatures are below freezing, remove it prior to opening the product (e.g. by melting the ice with warm air).
NOTICE
Damage to the inverter due to electrostatic discharge
Touching electronic components can cause damage to or destroy the inverter through electrostatic discharge.
- Ground yourself before touching any component.
Procedure:
- To prevent water or dust entering the interior of the inverter, clean and dry the lid prior to removal.
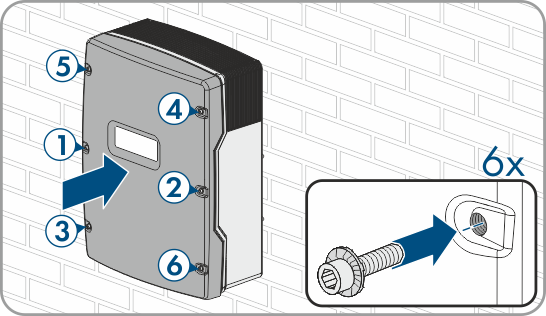
- On the Sunny Island, remove all screws of the lower enclosure lid using an Allen key (AF 5) and remove the enclosure lid. Retain the screws and conical spring washers for later use.
- Carefully remove the enclosure lid.
- Perform the repair or replacement.
- Replace the enclosure lid with the screws onto the enclosure and hold in place.
- Attach one conical spring washer to each screw. The grooved side of the conical spring washer must point to the screw head. Tip: The scope of delivery of the Sunny Island inverter includes one additional replacement screw with a conical spring washer.
- On the Sunny Island, fasten the enclosure lid following the sequence 1 to 6 using an Allen key (AF 5) (torque: 6 Nm). The teeth of the serrated conical spring washer must press into the enclosure lid. This ensures that the enclosure lid is grounded.
- Recommission the inverter ( > Recommissioning the Inverter).