ENGLISH
ENGLISH
DEUTSCH
ESPAÑOL
FRANÇAIS
ITALIANO
NEDERLANDS
POLSKI
PORTUGUÊS
SVENSKA
TÜRKÇE
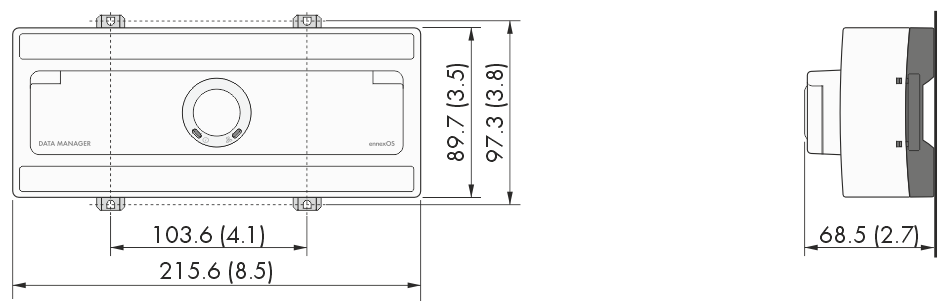
Dimensions for mounting
Dimensions for wall mounting (dimensions in mm (in))
Permitted and prohibited mounting positions
Recommended clearances for mounting
Table of Contents
toggle menu
Information on this Document
Validity
Target Group
Content and Structure of this Document
Levels of Warning Messages
Symbols in the Document
Typographies in the document
Designations in the Document
Additional Information
Safety
Intended Use
IMPORTANT SAFETY INSTRUCTIONS
Scope of delivery
Product overview
Overview of compatible products
Device function
Product Description
Symbols on the Product
Reset button
LED Signals
Interfaces and Functions
Wi-Fi access point
SMA Speedwire
Modbus
SunSpec Modbus
User Interface
Sunny Portal
Dashboard
Energy Maximizer
Energy Planner
Plant-wide parameterization
Energy Monitoring
FTP push
SMA Premium
SMA Smart Connected
Grid Management Services
Reactive Power Control
Zero export
Active Power Limitation
Direct selling
Device Key (DEV KEY)
Mounting
Requirements for Mounting
Requirements for the Mounting Location
Permitted and prohibited mounting positions
Dimensions for mounting
Recommended clearances for mounting
Mounting the Product on the DIN Rail
Mounting the Product on the Wall
Connection
Requirements for the Connection
Connection cable requirements for power supply terminal X1
Signal cable requirements for fast stop X2
Signal cable requirements for multifunction relay X3
Signal cable requirements for analog terminals X4 to X7
Signal cable requirements for temperature input X8
RS485 X9 cable requirements
Signal cable requirements for digital terminals X10 to X13
Network cable requirements X14 to X16
Overview of the Connection Area
Preparing the Connection Cable
Terminal for fast stop X2
Fast stop X2
PIN assignment X2
Circuitry overview X2
Connect switch for fast stop to X2
Connection to the multifunction relay X3
Digital output X3 (MFR)
Pin assignment X3 (MFR)
Circuitry overview X3
Connecting signal source to X3
Connection to the analog output X4/X5
Analog outputs X4/X5
PIN assignment X4
PIN assignment X5
Circuitry overview X4/X5
Connecting the remote terminal to X4/X5
Connection to the analog input X6/X7
Analog inputs X6/X7
PIN assignment X6
PIN assignment X7
Circuitry overview X6/X7
Connecting signal source to X6/X7
Connection to temperature input X8
Temperature input X8
PIN assignment X8
Circuitry overview X8
Connecting temperature sensor to X8
Connection to the RS485 X9 input
RS485 input X9
PIN assignment X9
Circuitry overview X9
Connecting RS485 devices to X9
Replacing SMA Com Gateway with RS485 Devices
Connection to digital input X10
Digital inputs X10
PIN assignment X10
Circuitry overview X10
Connecting signal source to X10
Connection to digital input X11
Digital inputs X11
PIN assignment X11
Circuitry overview X11
Connecting signal source to X11
Connection to the multifunction relay X12/X13
Digital output X12/X13 (MFR)
Pin assignment X12 (MFR)
Pin assignment X13 (MFR)
Circuitry overview X12/X13
Connecting signal source to X12/X13
Connection to the system network X14/X15
System network X14/X15
Connecting network cables to X14/X15
Connection to the Internet X16
Internet X16
Connecting network cable to X16
Connection to the voltage supply X1
Voltage supply X1
PIN assignment X1
Circuitry overview X1
Connecting the voltage supply to X1
Commissioning
Requirements for Commissioning
Starting the Installation Assistant
Changing the Network Configuration
Establishing a Connection to the User Interface
Connection in the local network
Access addresses for the product in the local network
Ports for data communication in the local network
Establishing a connection in the local network
Direct connection via Wi-Fi
Connection options for Wi-Fi direct connection
Access information for direct Wi-Fi connection
Establishing a direct Wi-Fi connection by entering the Wi-Fi data
Establishing a direct Wi-Fi connection by scanning the QR code
Registration in Sunny Portal
Profiles for data communication
Register as a new user in Sunny Portal
Log in to Sunny Portal as an existing user
Create new PV system
Add product to an existing system
Operation
Use of the user interface powered by ennexOS
Fallback Behavior
Function of the fallback behavior
Fallback behavior in the event of communication failure to the digital inputs
Fallback behavior in the event of communication failure to the energy meter at the point of interconnection
Fallback behavior in reactive power mode
SG Ready interface
Configuration of SG Ready interface
Example: Control of a heat pump by SMA Data Manager M
Replace the SMA Data Manager M (EDMM-10) with the SMA Data Manager M (EDMM-20)
Troubleshooting
Obsolete or incorrect measured values are displayed
Not all devices are being detected
The product user interface cannot be called up
No data are displayed on the user interface of the product
Carry out reset
Decommissioning the Product
Disposal
Technical Data
Communication
Voltage supply
Climatic Conditions
General Data
Digital inputs
Digital output (multifunction relay)
Analog inputs
Analog outputs
Temperature inputs
RS485 inputs
Equipment
Accessories
Compliance Information
EU Declaration of Conformity
Contact