Connecting the AC Cable to Sunny Multigate
Connect the free end of the AC cable coming from the AC field plug or the junction box to the connecting terminal plate of the Sunny Multigate. The connecting terminal plate assigned for this is labeled Inverter.
Requirements:
- All electrical installations must be carried out in accordance with all electrical standards applicable on-site and the National Electrical Code® (NE, ANSI/NFPA 70) (see National Electrical Code®, paragraph 690.8 (B)(1), paragraph 690.8(A)(3)) or the Canadian Electrical Code® CSA C22.1.
- The Sunny Multigate is correctly installed in the industrial enclosure.
Cable requirements for use of AC field plug:
- When using the AC field plug, observe the cable requirements for assembling the AC field plug ( > Connecting the AC Cable to the AC Field Plug or to the Junction Box)
Cable requirements for use of junction box:
- Do not use shielded cables.
- Only use copper cables.
- Temperature-resistant up to at least +90°C (+194°F) wet/dry
- Use only cables with stranded wires.
- Cable cross-section: 14 AWG to 12 AWG
- Do not use Wire Nuts®.
- This cable must be installed in an inaccessible location or in a National Electrical Code® compliant conduit.

Installation of several Sunny Multigate devices
When installing several Sunny Multigate devices in a PV system, a three-wire cable with grounding conductor must be used for each Sunny Multigate in order to guarantee trouble-free communication between the Sunny Multigate and the inverter.
Procedure:
- Make sure that the two-pole circuit breaker is switched off and cannot be reconnected.
- Make sure that the PV modules are covered.
- When using a junction box, assemble the AC cable and install in accordance with the instructions of the junction box manufacturer and the National Electrical Code®.
- Route the AC cable from the AC field plug or the junction box through an opening at the bottom of the industrial enclosure to the terminal Inverter of the Sunny Multigate.
- Dismantle the AC cable to the desired length.
- Strip the insulation of the three AC cable conductors by 8 mm (0.31 in) each.
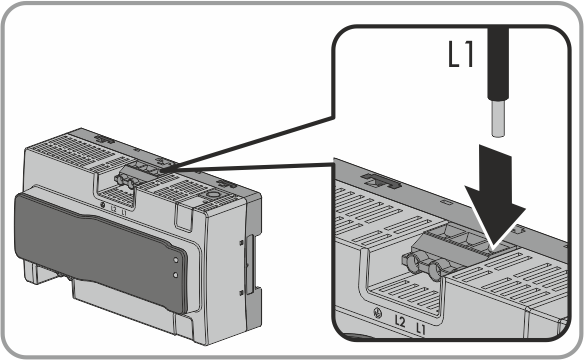
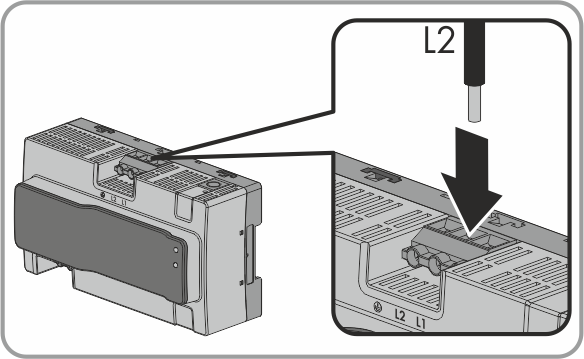
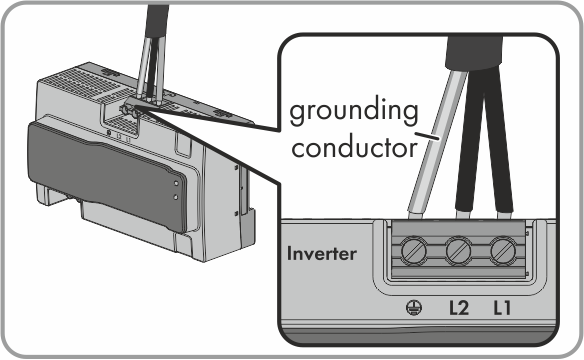
- Be sure to observe the terminal labels on the Sunny Multigate.
- Connect all conductors in accordance with the terminal labels.
- Connect the grounding conductor of the AC cable to the terminal
 of the Sunny Multigate. Make sure that the conductor is inserted into the terminal right up to the stop.
 - Connect the conductor L1 of the AC cable to the terminal L1 of the Sunny Multigate. Make sure that the conductor is inserted into the terminal right up to the stop.
- Connect the conductor L2 of the AC cable to the terminal L2 of the Sunny Multigate. Make sure that the conductor is inserted into the terminal right up to the stop.
- Tighten all three screws of the connecting terminal plate using a flat-blade screwdriver (blade width: 3.5 mm (0.14 in)) (torque: 0.6 Nm (5.31 in-lb)).
- Make sure that all terminals are correctly allocated.
- Make sure that all conductors are securely in place.
 DANGER
Danger to life due to electric shock
Do not disconnect under load
PV plug connections must not be disconnected while under load. They can be placed in a no load state by switching off the DC/AC converter or breaking the AC circuit.
NOTICE
Damage to the Sunny Multigate due to incorrectly connected conductors
If the grounding conductor and L1 or L2 are swapped, the Sunny Multigate could be damaged during commissioning.