Decommissioning the Product
To decommission the product completely upon completion of its service life, proceed as described in this Section.
 CAUTION
Risk of injury due to weight of product
Injuries may result if the product is lifted incorrectly or dropped while being transported or mounted.
- Wear suitable personal protective equipment for all work on the product.
Procedure:
- Disconnect the product from voltage sources ( > Disconnecting the product from voltage sources).
- Wait 30 minutes for the enclosure to cool down.
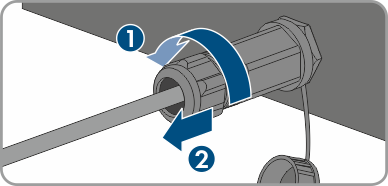
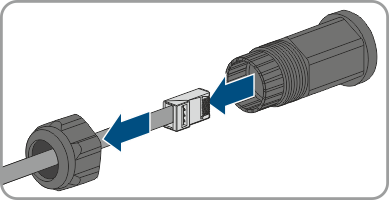
- Unscrew the swivel nut from the threaded sleeve for the network cable.
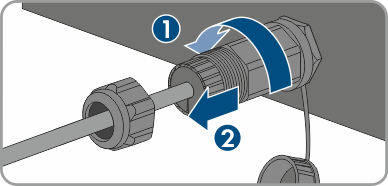
- Remove the threaded sleeve from the thread of the network port on the product.
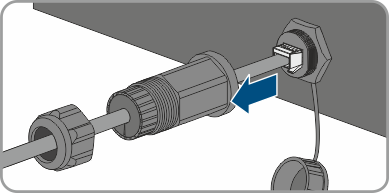
- Release the network cable plug and pull it out of the jack on the product.
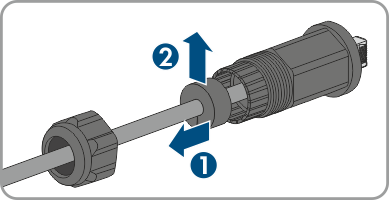
- Take the cable support sleeve out of the threaded sleeve and remove the cable support sleeve from the network cable.
- Lead the network cable out of the threaded sleeve and the swivel nut.
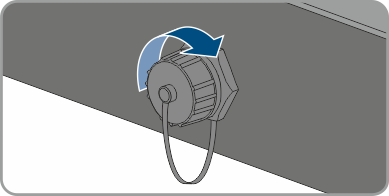
- Screw the protective cap onto the network port.
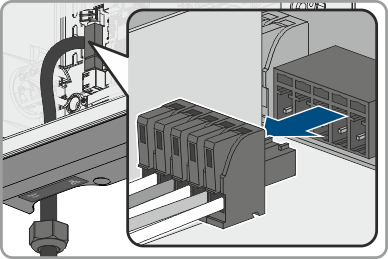
- Remove the terminal blocks for connecting the signal source to the digital input from the port for connecting a digital signal source.
- Remove the conductors from the terminal blocks.
- Lead the connection cable out of the product. If necessary, loosen the cable gland.
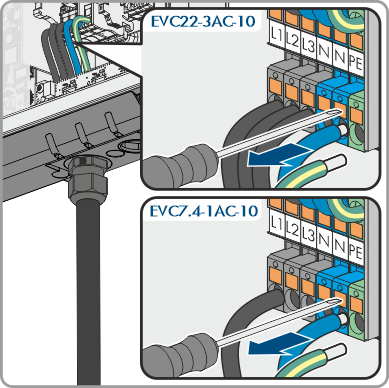
- For EVC22-3AC-10, remove conductors L1, L2, L3, N and grounding conductor from the terminal block for connecting the utility grid. For EVC7.4-1AC-10, remove conductors L1, N and grounding conductor from the terminal block for connecting the utility grid. Stick a flat-blade screwdriver (blade width: 3 mm) as far as it can go into the rectangular opening via the terminal and remove the conductors from the terminals.
- Lead the AC cable out of the product through the cable gland. If necessary, loosen the swivel nut of the cable gland.
- With EVC22-3AC-10, remove the conductors L1, L2, L3, N, grounding conductor and CP cable from the terminal block for connecting of the charging cable. With EVC7.4-1AC-10, remove the conductors L1, N, grounding conductor and CP cable from the terminal block for connecting of the charging cable. Stick a flat-blade screwdriver (blade width: 3 mm) as far as it can go into the rectangular opening via the terminal and remove the conductors from the terminals.
- Lead the charging cable through the bending protection spiral and the cable gland out of the product. If necessary, loosen the bending protection spiral.
- Replace the enclosure lid and tighten the screws in the sequence shown (TX25, torque: 6 Nm ± 0.3 Nm). Finally, retighten the first screw.
- Loosen the hexagon head screw with which the mounting bracket is attached to the support surface.
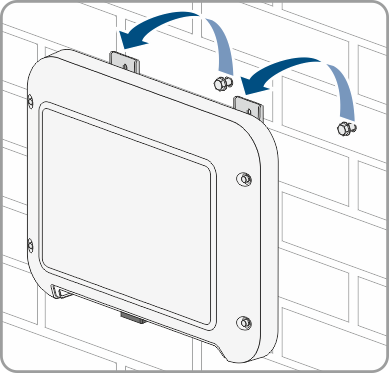
- Slightly loosen the 2 screws for fixing the metal brackets at the top of the product.
- Remove the product with the metal brackets from the screws.
- If the product is to be stored or shipped, pack the product. Use the original packaging or packaging that is suitable for the weight and size of the product.
- If the product is to be disposed of, dispose of the product in accordance with the locally applicable disposal regulations for electronic waste.
 DANGER
Danger to life due to high voltages
CAUTION
Risk of burns due to hot enclosure parts