Mounting the Inverter
Additionally required material (not included in the scope of delivery):
At least 3 or 4 screws (depending on support surface) suitable for both the support surface and the weight of the inverter
3 or 4 washers suitable for the screws
3 or 4 screw anchors (depending on support surface) suitable for the support surface and the screws
 CAUTION
Risk of injury due to weight of product
Injuries may result if the product is lifted incorrectly or dropped while being transported or mounted.
- Transport and lift the product carefully. Take the weight of the product into account.
- Wear suitable personal protective equipment for all work on the product.
Procedure:
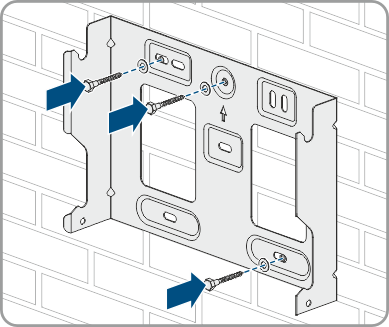
- Align the mounting bracket horizontally and mark the position of the drill holes. Use at least 1 hole on the left and one on the right. At least 4 holes have to be utilized when mounting to drywall.
- Set the mounting bracket aside and drill the marked holes.
- Insert screw anchors into the drill holes if the support surface requires them.
- Tighten the mounting bracket horizontally with screws and washers. Ensure the mounting bracket is correctly aligned.
- The mounting bracket is installed correctly.
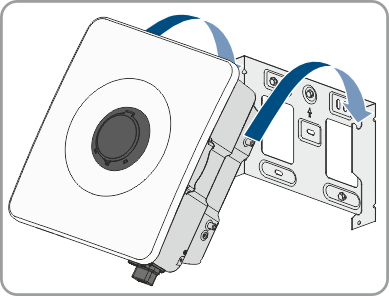
- Do not place the inverter vertically under any circumstances as this could damage the device connectors.
- Pick up the inverter by the recessed grips on the sides and, holding it slightly tilted, insert it over the upper 2 rivets into the upper recesses of the mounting bracket.
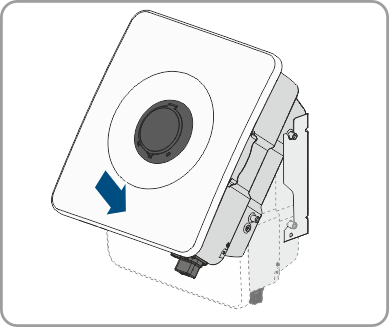
- Carefully rotate the bottom of the inverter toward the support surface and place it at a 90° angle to the base. Make sure that the bottom and top rivets are securely seated in the corresponding recesses.
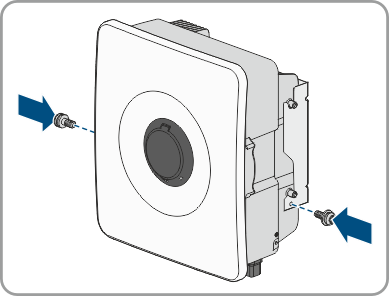
- Attach the inverter to the mounting bracket using the supplied screw and washer assemblies (M6x14).
- Make sure that the inverter is securely attached by carefully moving the enclosure back and forth.