
Mounting the sound absorber at the air inlet of the inverter
Required mounting material (included in the scope of delivery):
1 sound absorber
4 lifting lugs
1 mounting rail
10 screws M8 for mounting the mounting rail and the sound absorber
2 fitted bolts M8
20 washers
20 silicone washers
Requirements:
At least 2 people are available for mounting the sound absorber.
Endless loop straps are used.
The hoist is properly attached to the crane.
A traverse and endless loop straps are used. The endless loop straps are long enough so that the traverse does not touch the roof of the product during transport.
NOTICE
Risk of corrosion on the inverter enclosure due to moisture during installation
Moisture on the inverter prior to installation of the sound absorber can penetrate inside the inverter. This can result in corrosion.
- Protect the inverter without roof from ambient influences such as direct rain or snow. Use a tarpaulin or store the inverter in a sheltered place.
- Ensure that the inverter is dry before the sound absorber is installed.
- Ensure that no moisture has penetrated the openings in the roof.
Procedure:
- Ensure that the top of the inverter is dry.
- Unpack the parts to be mounted from the foil.
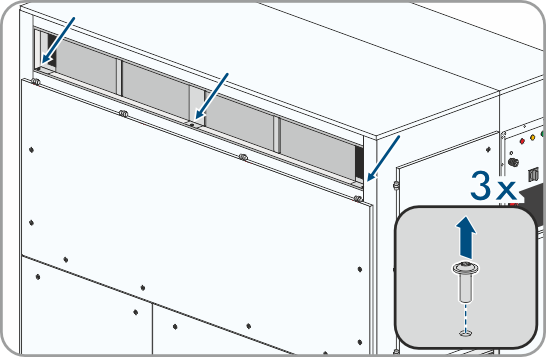
- On the AC side of the inverter remove the bottom screws from the mounting brackets of the air inlet (TX40). Make sure not to damage the fins of the heat exchanger.
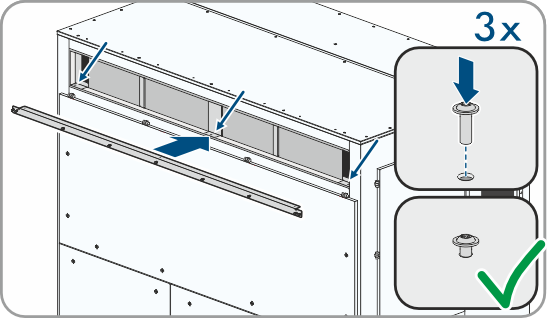
- Align the mounting rail at the bottom edge of the mounting brackets and secure with the 3 screws from disassembling the mounting brackets. Screw in the screws in such a way that the mounting rail can be moved for the following work steps.
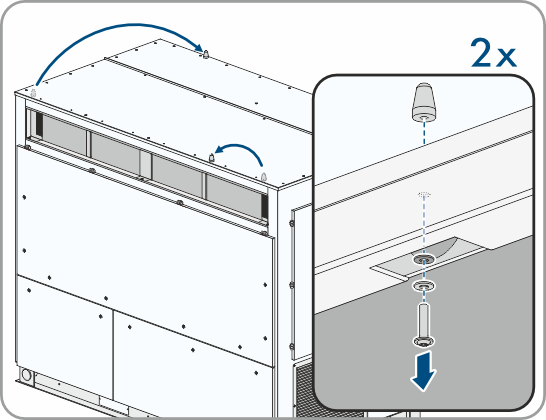
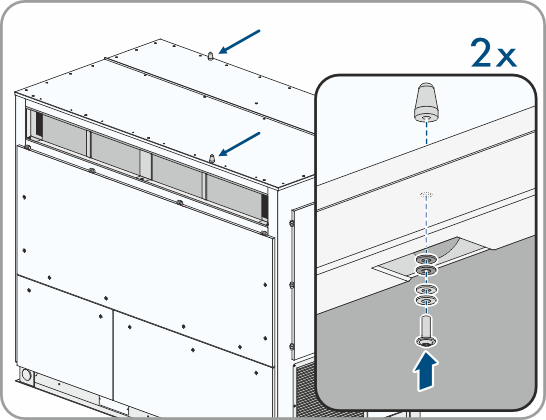
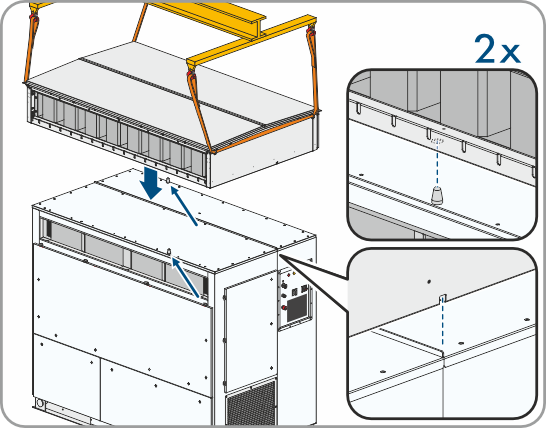
- With production version A7: Move the fitted bolts located on the top of the inverter to the second screw opening from the right on both the AC and DC sides and lightly tighten them with the existing bolt, washer and silicone washer (M8, hex socket AF5). Secure the fitted bolt with pliers. The fitted bolts should be able to be moved for the following work steps and must later be tightened with 3 Nm (26.55 in-lb).
- With production version A4 or older: On the AC side and the DC side on the top of the inverter, lightly mount the fitted bolts with bolts, 2 washers and 2 silicone washers (M8, hex socket AF5) each in the second screw opening from the right. Secure the fitted bolt with pliers. The fitted bolts should be able to be moved for the following work steps and must later be tightened with 3 Nm (26.55 in-lb).
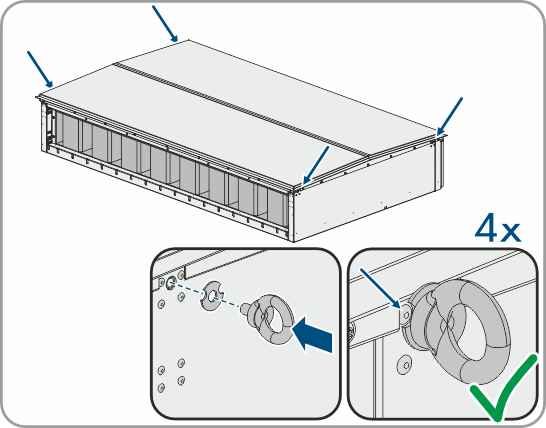
- Mount 1 lifting lug with 1 special washer each to the corners of the sound absorber. At the same time, make sure that the openings in the special washer is over the rivets on the inverter and that the lifting lugs have been fully screwed in and are aligned vertically.
- Attach the endless loop straps to the 4 lifting lugs on the sound absorber.
- Ensure that the lifting gear is attached correctly.
- Carefully lift the sound absorber over the inverter and align at the fitted bolts. Make sure that the open side of the sound absorber is on the AC side of the inverter and the closed side of the sound absorber is on the DC side of the inverter.
- Slowly lower the sound absorber onto the fitted bolt. Ensure that the opening in the sound absorber engages positively with the seal in the middle of the roof. Make sure that the AC side is vertically flush with the frame parts of the sound absorber and that the anchoring points of the sound absorber are visible in the holes in the frame profile of the inverter.
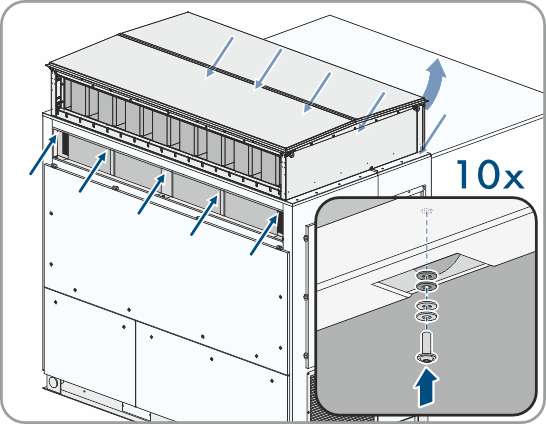
- Attach the sound absorber on the AC side and the DC side to the inverter using 4 screws, 8 washers and 8 silicone washers each (hex socket AF5, tightening torque: 3 Nm (26.55 in-lb)). To do this, open the flap on the DC side.
- Tighten the fitted bolts (tightening torque: 3 Nm (26.55 in-lb)).
- Remove the service covers on the air duct ( > Remove service covers of the air duct).

Also see: