Checking and cleaning sound absorber
The sound absorber must be checked and cleaned every 24 months, or after exceptional environmental events.

Correct performance of maintenance work
All maintenance work must be performed as described in this document. Deviations from procedures or failure to comply with the maintenance intervals will lead to any guarantee- or warranty claims becoming null and void.
Adverse ambient conditions reduce maintenance intervals
Location and ambient conditions influence the maintenance intervals. In particular, cleaning and corrosion protection work may be required more frequently depending on the conditions at the installation site. Examples of adverse ambient conditions include storms, flooding, coastal location, or a site with high dust pollution levels.
- If the product is subject to adverse ambient conditions, a reduction of the maintenance intervals is recommended. Above all, the intervals between cleaning work and corrosion protection should be reduced.
- SMA recommends a monthly optical inspection to determine the maintenance requirement.
Maintenance report for maintenance
All maintenance work must be documented in a maintenance report. Contact us for the maintenance report Contact.
- After maintenance work, save the maintenance report.
- In addition, a copy is to be sent to maintenance.service@sma.de at the latest four weeks after completion of the maintenance work. Enter the serial number of the system on which maintenance was carried out in the subject line.
Consumables and maintenance materials
Only those consumables and maintenance materials not normally included in the standard equipment of an electrically qualified person are listed. It is taken for granted that standard tools and materials such as torque wrenches, one-contact voltage testers and wrenches will be available for all maintenance operations.
Spare parts
Only original parts or parts recommended by SMA Solar Technology AG are to be used as spare parts when replacing components.
Spare parts can be identified via the reference designation and the circuit diagram. The spare-parts list includes the article numbers of each spare part. For information on a specific article number, contact us Contact.
Required maintenance material:
- Brush for removing dust deposits
- Vacuum cleaner
Procedure:
- Ensure that the product is disconnected from all poles.
- Check the ventilation grids of the inlet air sound absorber for visible damage. If ventilation grids are damaged, contact us.
- Vacuum the ventilation grid of the inlet air sound absorber and clean it with a brush.
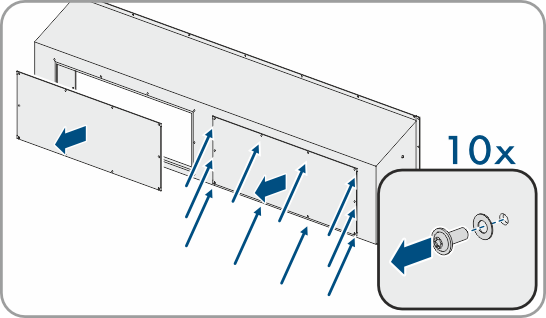
- Remove the service covers of the air duct.
- Check the area behind the service covers for dirt, and vacuum with a vacuum cleaner if necessary. Make sure that the fins of the heat exchanger are not damaged.
- Attach the service covers of the inlet air sound absorber to the air duct using the previously removed screws (TX30, tightening torque: 6 Nm).
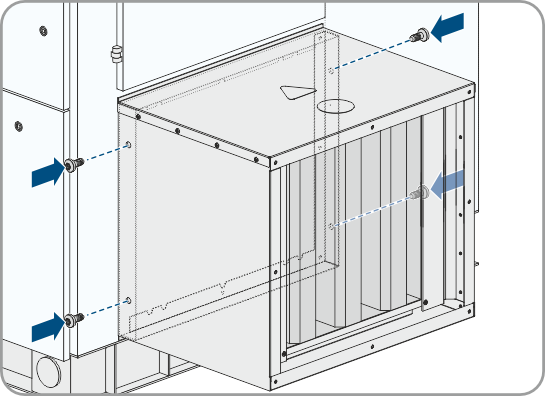
- Remove the four fastening screws from the exhaust air sound absorber and carefully pull the exhaust air sound absorber forward. Take the weight of the exhaust air sound absorber into account.
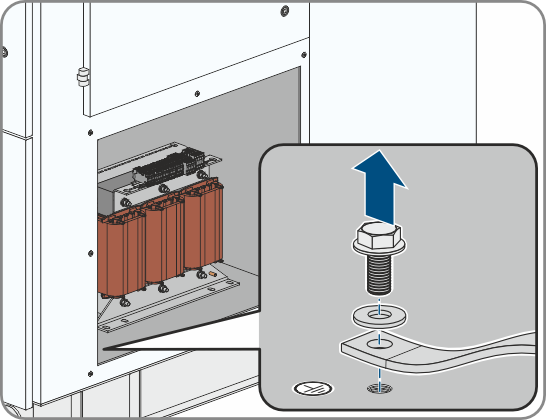
- Disassemble the ground strap from the inverter.
- Remove any dust deposits from the area behind the exhaust air sound absorber.
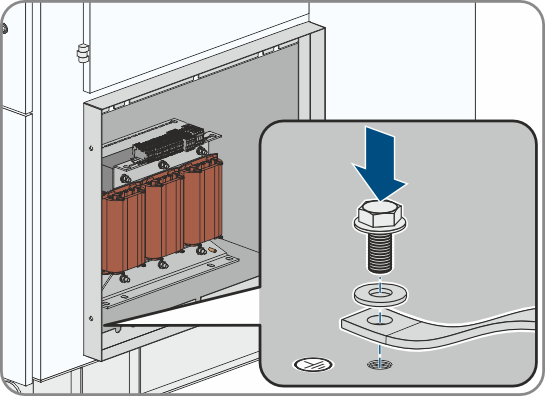
- Reattach the ground strap from the exhaust air sound absorber to the inverter (tightening torque: 15 Nm (132.8 in-lb)). Ensure that the grounding conductor connection is electrically correct.
- Fit the exhaust air sound absorber on the inverter (TX40, tightening torque: 18.0 Nm (159 in-lb)).