Mounting the Inverter
 Qualified person
Additionally required mounting material (not included in the scope of delivery):
- At least two screws that are suitable for the support surface and the weight of the inverter
- At least two washers that are suitable for the screws
- If necessary, two screw anchors suitable for the support surface and the screws
- To protect the inverter against theft: At least one security screw and, if necessary, a suitable screw anchor
CAUTION
Risk of injury when lifting the inverter, or if it is dropped
The inverter weighs 38 kg. There is risk of injury if the inverter is lifted incorrectly or dropped while being transported or when attaching it to or removing it from the wall mounting bracket.
- Carry and lift the inverter upright with the help of several people. Use both hands to grasp the recessed grips at the top and bottom, or use a steel rod (diameter: 30 mm at maximum). This will prevent the inverter from tipping forward.

NOTICE
Damage to the ESS pin connector from dirt and foreign bodies
In single-phase and three-phase inverters, the integrated differential current sensor detects the current difference between the neutral conductor and the line conductor(s). This will impair the function of the ESS.
- Always set the inverter down on a level support surface or lay it on its back.
Procedure:
- Ensure that no lines are laid in the wall which could be damaged when drilling holes.
- Align the wall mounting bracket horizontally on the wall and use it to mark the position of the drill holes. Use at least one hole on the right-hand and left-hand side in the wall mounting bracket.
- Set the wall mounting bracket aside and drill the marked holes.
- Insert screw anchors into the drill holes if the support surface requires them.
- Secure the wall mounting bracket horizontally using screws and washers.
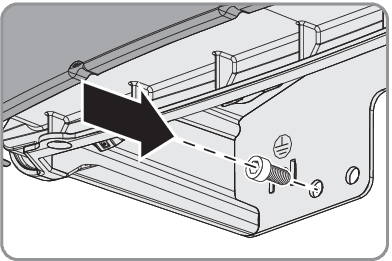
- If the inverter is to be secured against theft, mark one drill hole or two drill holes for the attachment of the security screw:
-
Hook the inverter into the wall mounting bracket.
-
Mark the drill hole on the left-hand or right-hand side. If you want to secure the inverter with two safety screws, mark one drill hole on the left-hand side and one on the right-hand side.
-
Remove the inverter by lifting it vertically up and off the wall mounting bracket.
-
Drill the hole or holes to attach the safety screw(s) and insert the screw anchor(s).
- Hook the inverter into the wall mounting bracket.
- Secure the inverter to the wall mounting bracket on both sides using the M6x8 screws provided and an Allen key (AF 5). Only tighten the screws hand-tight.
- Close the recessed grips with the ventilation grids. Ensure that the assignment is correct. The correct assignment is marked on the inside of each ventilation grid: links/left for the left-hand side and rechts/right for the right-hand side.
- Once the holes for attaching the safety screw have been pre-drilled, secure the inverter with at least one safety screw through the pre-drilled hole.
- Ensure that the inverter is securely in place.
CAUTION
Risk of injury due to damaged cables
There may be power cables or other supply lines (e.g. gas or water) routed in the wall.