Mounting the product
Additionally required mounting material (not included in the scope of delivery):
3 screws, suitable for the support surface and the weight of the inverter (diameter: minimum 6 mm)
3 washers, suitable for the screws (outer diameter: minimum 18 mm)
Where necessary, 3 screw anchors suitable for the support surface and the screws
 CAUTION
Risk of injury due to weight of product
Injuries may result if the product is lifted incorrectly or dropped while being transported or mounted.
- Transport and lift the product carefully. Take the weight of the product into account.
- Wear suitable personal protective equipment for all work on the product.
Procedure:
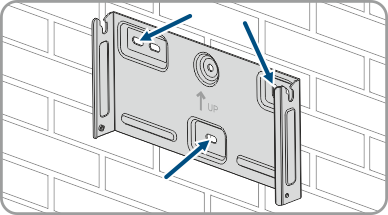
- Align the wall mounting bracket horizontally on the wall and mark the position of the drill holes. Use at least one hole on the right- and left-hand side and the lower hole in the middle of the wall mounting bracket. Tip: When mounting on a post, use the upper and lower central holes of the wall mounting bracket.
- Set the wall mounting bracket aside and drill the marked holes.
- Insert screw anchors into the drill holes if the support surface requires them.
- Secure the wall mounting bracket horizontally using screws and washers.
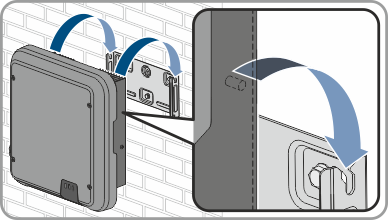
- Hook the inverter into the wall mounting bracket. When doing so, the two right- and left-hand keys on the ribs on the rear side of the inverter must be hooked into the respective keyways in the wall mounting bracket.
- Ensure that the inverter is securely in place.
- Secure the inverter to the wall mounting bracket on both sides with a pan head screw (M5x12) provided. Insert a screw into the lower screw hole of the inverter's anchorage bracket and tighten it (TX25, torque: 2.5 Nm).