Connecting the PV Array
 Qualified person
NOTICE
Damage to the inverter due to ground fault on DC side during operation
Due to the transformerless topology of the product, the occurance of ground faults on DC side during operation can lead to irreparable damage. Damages to the product due to a faulty or damaged DC installation are not covered by warranty. The product is equipped with a protective device that checks whether a ground fault is present during the starting sequence. The product is not protected during operation.
- Ensure that the DC installation is carried out correctly and no ground fault occurs during operation.
DC cable requirements:
Aluminum or copper wires must be used.
-
Cable cross-section for connecting one PV combiner box: 95 mm² to 300 mm²
-
Maximum cable cross-section for connecting two PV combiner boxes: 95 mm² to 185 mm²
-
External diameter for connecting one PV combiner box: 18 mm to 25 mm
-
External diameter for connecting two PV combiner boxes: 12 mm to 20 mm
The cables must be equipped with suitable terminal lugs for DC connection in the inverter. The DC cables in the inverter are equipped with terminal lugs made of tinned copper.
Requirements:
-
Depending on the design, one or two PV combiner boxes must be present.
There must be an external DC load-break switch between the PV inverter and the PV array (e.g., a PV combiner box including a load-break switch).
The DC cables have been inserted into the product.
Additionally required material (not included in the scope of delivery):
-
Two or four terminal lugs (flange hole: M10, cross-section: appropriate to DC cables used)
-
Clean cloth
-
Ethanol cleaning agent
-
Press tool
DC connection overview:

DC connection overview for the connection of one PV combiner box or of two PV combiner boxes
Position | Designation |
|---|---|
A | DC cable with tin-plated copper terminal lugs (installed in the product) |
B | M10x40 combination hexagon head screw (AF16) |
C | Washer M10 |
D | Hex nut M10 |
E | DC cable with terminal lug (to be provided by the customer) |
Procedure:
- Ensure that no voltage is present on the DC cables.
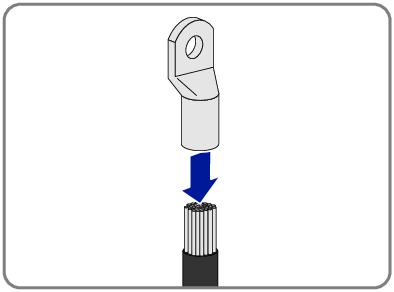
- Dismantle the DC cables.
- Fit terminal lugs to the DC conductors.
- Remove any cable remnants from the product.
- Remove the fixing of the pre-harnessed DC cables from the product.
- Clean the contact surfaces of all terminal lugs using a clean cloth and ethanol cleaning agent and do not touch the contact surfaces after cleaning.
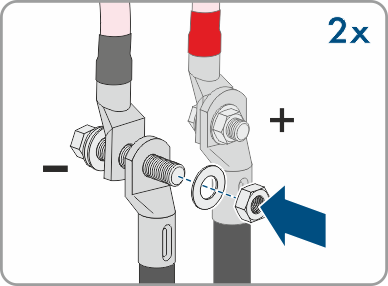
- Connect the DC cables with each other. To do this, insert the screw and washer assembly (M10x40) from the back through the round holes of the terminal lugs and from the front tighten with the washer (M10) and the hex nut (AF16, torque: 24 Nm ± 2 Nm). Ensure correct polarity.
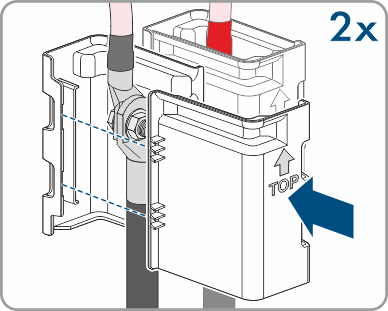
- Place the touch protection elements around the terminal lugs and plug together until they audibly click into place.
- Firmly tighten the swivel nuts of the cable glands.