
Connecting the Voltage Supply
 WARNING
Danger to life due to electric shock
Under fault conditions, when working on the power supply circuit there may be dangerous voltages present on the product. This can result in death or serious injury.
- For power supply units with a fixed connection, make sure that a disconnection unit (e.g. miniature circuit breaker) is present outside the power supply unit.
- For power supply units with a plug connection, make sure that the electrical outlet for the power supply unit is close to the power supply unit.
- The disconnection unit and the electrical outlet for the power supply unit must be freely accessible at all times.
NOTICE
Damage to the product due to condensation
If the product is moved from a cold environment to a warm environment, condensation may form in the product. This can damage the product or impair its functionality.
- When there are large temperature differences, wait until the product has reached room temperature to connect the voltage supply.
- Make sure the product is dry.
Additionally required material (not included in the scope of delivery):
1 power supply unit
1 AC connection cable
1 connection cable for the connection of the power supply unit to the product
1 grounding cable
1 ring terminal lug M4 for grounding cable
Requirements for the power supply unit:
Short-circuit current: < 8 A
Nominal output power: 18 W
DC output voltage: 9 V to 36 V
Compliance with the requirements on current sources with limited power in accordance with IEC 60950
Requirements for the connection cable for the connection of the power supply unit to the product:
Core cross-section: 0.5 mm² to 1.5 mm² (16 AWG to 20 AWG)
Number of insulated conductors: 3
Maximum cable length: 3 m (9.8 ft)
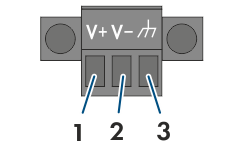
Plug assignment:
Plug | Position | Assignment |
|---|---|---|
| 1 | Input voltage 9 to 36 V DC+ |
2 | Input voltage 9 to 36 V DC- | |
3 | Ground (GND) |
Grounding cable requirements:
Core cross-section: 0.5 mm² to 1.5 mm² (16 AWG to 20 AWG)
Number of insulated conductors: 1
Maximum cable length: 3 m (9.8 ft)
Procedure:
- Mount the power supply unit (see the manufacturer manual).
- Connect the connection cable to the power supply unit (see the manufacturer manual). Make a note of the insulated conductor colors and trim the unused insulated conductors back to the cable sheath.
- Connect the connection cable to the supplied 3-pole terminal block. To do this, release the screws of the required terminal points using a suitable tool, plug the wires into the terminal points and tighten the screws of the terminal points hand-tight. Observe the pin assignment.
- Trim unused insulated conductors flush with the cable sheath.
- Plug the 3-pole terminal block into the jack Power Input and attach.
- Connect the AC connection cable to the power supply unit (see the manufacturer manual).
- Disconnect the connection point from voltage sources and ensure that the connection point is voltage-free.
- Connect the other end of the AC connection cable to the voltage supply.
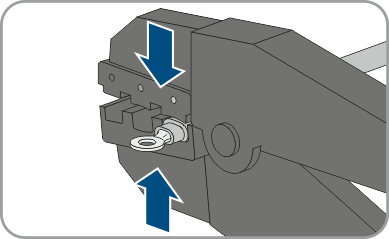
- Dismantle the grounding cable and strip the insulation according to the ring terminal lug used.
- Insert the stripped section of the grounding cable into the ring terminal lug and crimp using a crimping tool.
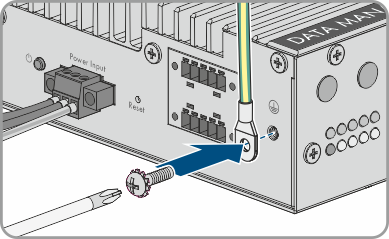
- Attach the ring terminal lug to the product at the point shown. Use M4 screw with tooth lock washer for this (PH1, torque: 2.5 Nm (22.2 in-lb)).
- Connect the connection point to the utility grid.

WARNING
Danger to life due to electric shock
Lethal voltages are present at the connection point of the utility grid. This can result in death or serious injury.
- The product starts operation ( > Commissioning).