Connecting the Network Cables
 Qualified person

Cables to be connected by means of cable glands
As standard for this inverter, the cables are to be connected by means of cable glands. SMA Solar Technology AG recommends using the cable glands included in the delivery. If required, adapters for conduits can be mounted on the enclosure openings of the inverter instead of using cable glands. Thus, cables laid in the conduits can be routed into the inverter. When using conduits, all locally applicable laws, standards and directives must be observed and the conduits as well as the enclosure openings must be protected against penetrating moisture.
 DANGER
Danger to life due to electric shock in case of overvoltages and if surge protection is missing
Overvoltages (e. g. in the event of a flash of lightning) can be further conducted into the building and to other connected devices in the same network via the network cables or other data cables if there is no surge protection. Touching live parts and cables results in death or lethal injuries due to electric shock.
- Ensure that all devices in the same network are integrated in the existing overvoltage protection.
- When laying the network cable outdoors, ensure that there is suitable surge protection at the network cable transition from the product outdoors to the network inside the building.
- The Ethernet interface of the product is classified as "TNV-1" and offers protection against overvoltages of up to 1.5 kV.
Additionally required material (not included in the scope of delivery):
Network cables
Where required: Field-assembly RJ45 connector.
Procedure:
- Disconnect the inverter from all voltage sources ( > Disconnecting the Inverter from Voltage Sources).
- If the enclosure lid of the DC-Connection Unit is closed, remove it as follows: Unscrew all ten screws with a Torx screwdriver (TX25) and remove the enclosure lid carefully forward.
- Set the screws and the enclosure lid aside and store safely.
- Remove the swivel nut from the cable gland for the communication cable.
- Thread the swivel nut over the network cable.
- Remove the two-hole cable support sleeve from the cable gland.
- Remove the sealing plug from one of the enclosure openings of the two-hole cable support sleeve and insert the network cable into the enclosure opening.
- Press the two-hole cable support sleeve with the cable into the cable gland and guide the network cable to the communication assembly in the DC Connection Unit. Ensure that any unused enclosure openings of the two-hole cable support sleeve are sealed with sealing plugs.
- When using a self-assembly network cable, assemble the RJ45 connectors and connect them to the network cable (see connector documentation).
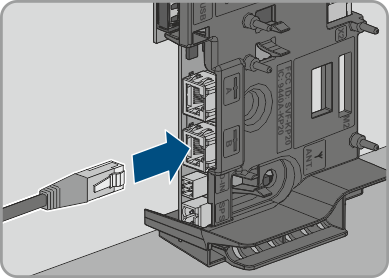
- Put the RJ45 plug of the cable into one of the network sockets of the communication assembly.
- Ensure that the RJ45 plug is securely in place by pulling slightly on the cable.
- Tighten the swivel nut on the cable gland hand-tight. This will secure the network cable in place.
- If the inverter is installed outdoors, install overvoltage protection for all components in the network.
- If you would like to integrate the inverter into a local network, connect the other end of the network cable to the local network (e.g. via a router).
 DANGER
Danger to life due to electric shock


