Decommissioning the Inverter
 Qualified person
To decommission the inverter completely upon completion of its service life, proceed as described in this Section.
CAUTION
Risk of injury when lifting the inverter, or if it is dropped
The inverter weighs 84 kg. You risk injury if you lift the inverter incorrectly or if it is dropped while being transported or mounted.
- Carry and lift the inverter in an upright position with several people without tilting it.
Requirements:
A pallet must be available.
Original packaging with paddings must be available.
All transport handles must be in place.
Procedure:
- Disconnect the inverter from all voltage sources ( > Disconnecting the Inverter from Voltage Sources).
- Wait 30 minutes for the enclosure to cool down.
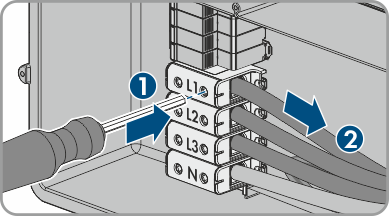
- Remove the AC cable from the inverter. To do so, loosen the screws (AF8) and pull the cables out of the terminal.
- Disconnect the grounding conductor from the grounding terminal. Loosen the screws (TX 25) and pull the grounding conductor out under the clip.
- Remove the AC cable from the inverter.
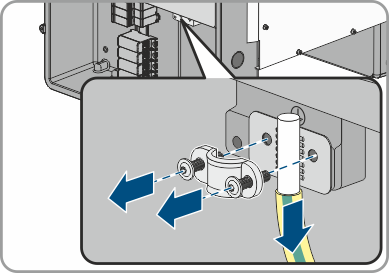
- Remove the M63 cable gland from the enclosure opening in the AC connection unit. To do so, remove the inside counter nut and remove the cable gland from the enclosure opening.
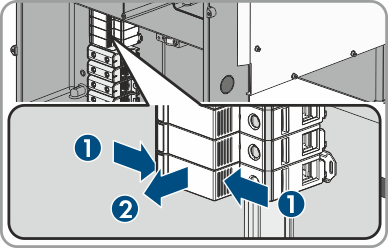
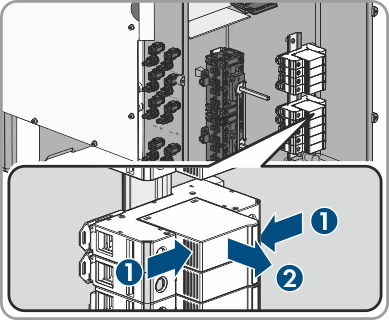
- When the AC surge arresters are inserted, pull the surge arresters out of the slots. To do so, squeeze the grooved areas on the left and right sides of the surge arrester.
- Position the enclosure lid of the AC-Connection Unit on the AC-Connection Unit and first tighten the upper-left and lower-right screws, and then the remaining screws crosswise (TX 25, torque: 6 Nm).
- Unscrew (TX25) all ten screws of the enclosure lid of the DC-Connection Unit and remove the enclosure lid carefully towards the front.
- Set the screws and the enclosure lid aside and store safely.
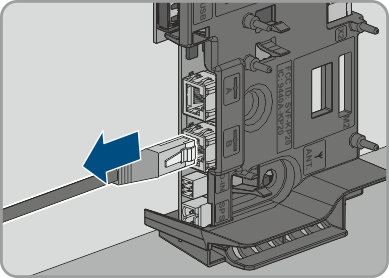
- Remove all connection cables from the communication assembly and pull out the connection cables out of the DC-Connection Unit.
- Remove all cable glands from the inverter. To do so, unscrew the counter nut from inside and remove the cable glad from the enclosure opening.
- When the DC surge arresters are inserted, pull the surge arresters out of the slots. To do so, squeeze the grooved areas on the left and right sides of the surge arrester.
- Position the enclosure lid of the DC-Connection Unit on the DC-Connection Unit and first tighten the upper-left and lower-right screws, and then the remaining screws crosswise (TX 25, torque: 6 Nm).
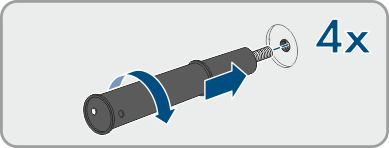
- Screw all four transport handles as far as they will go into the taps on the right- and left-hand side until they lie flush with the enclosure. When doing so, ensure that the transport handles are screwed into the tapped holes so that they are perfectly straight. If the transport handles are not screwed in straight, this can make it more difficult or even impossible to unscrew them later on and can damage the tapped holes to the extent that transport handles can no longer be screwed into them.
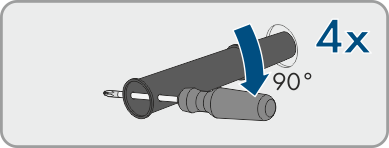
- Insert a screwdriver into the holes in the transport handle and turn the screwdriver through 90°. This ensures that the transport handles are securely tightened.
- To remove the feet or profile rails, lay the inverter carefully on the AC-Connection Unit side.
- To pack the inverter: pack the inverter in its original packaging. To do this, place the lower part of the original packaging with padding on the pallet. Then place the inverter on the pallet with the padding. In doing so, place the AC connection unit side of the inverter on top of the padding.
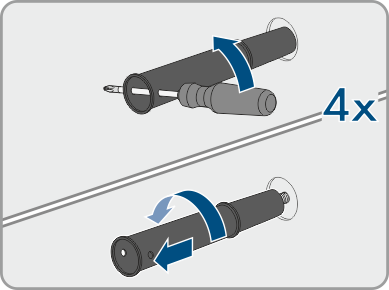
- To pack the inverter: remove all 4 transport handles from the threaded holes. If necessary, insert a screwdriver into the holes on the transport handle and use the screwdriver to remove the transport handle.
- To pack the inverter: pull the upper part of the original packaging over the inverter.
- To pack the inverter: insert the upper padding.
- To pack the inverter: close the packaging.
- To pack the inverter: secure the packaging and pallet with strapping or with fastening belts.
- Dispose of the inverter in accordance with the locally applicable disposal regulations for electronic waste.
 DANGER
Danger to life due to high voltages
CAUTION
Risk of burns due to hot enclosure parts