Mounting the product
 CAUTION
Risk of injury due to weight of product
Injuries may result if the product is lifted incorrectly or dropped while being transported or mounted.
- Carry and lift the product upright with the help of several people. Take the weight and the center of gravity of the product into account. The center of gravity is on the side of the AC-Connection Unit.
- Wear suitable personal protective equipment for all work on the product.
- Transport the product using the carrying handles or hoist. Take the weight of the product into account.
- Use all carrying handles provided during transport with carrying handles.
- Do not use the carrying handles as attachment points for hoist equipment (e.g. straps, ropes, chains). Insert eye bolts into threads provided on top of the product to attach the hoist system.
NOTICE
Damage to the threaded holes due to the use of screws that are too long and exceeding the torque when mounting the feet
If the screws supplied are not used for mounting the feet and the maximum torque is exceeded, the screws will protrude too deeply into the threaded holes. This can cause the threaded hole to fracture and cracks will appear in the enclosure.
- Only use the M8x40 hexagonal head screws supplied for mounting the feet.
- Tighten the screws with a torque of 16 Nm.
Additionally required material (not included in the scope of delivery):
For transport with a hoist: 4 eye bolts (M8)
Procedure:
- Attach each foot with two M8x40 hexagon head screws and two washers on the two external taps (M8x14) on the underside of the inverter (torque: 16 Nm). Press the packaging on the bottom side down or cut it open. The screw holes on the bottom of the inverter must be exposed.
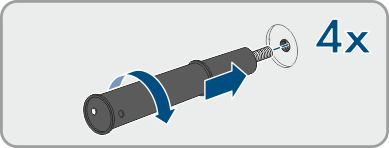
- Screw the transport handles as far as they will go into the taps on the right- and left-hand side until they lie flush with the enclosure. When doing so, ensure that the transport handles are screwed into the taps so that they are perfectly straight. If the transport handles are not screwed in straight, this can make it more difficult or even impossible to unscrew them later on and can damage the taps to the extent that transport handles can no longer be screwed into them.
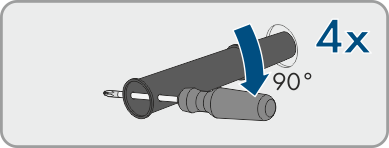
- Insert a screwdriver into the holes in the transport handle and turn the screwdriver through 90°. This ensures that the transport handles are securely tightened.
- Remove the inverter from the Euro pallet and position the inverter at the installation location.
- If the inverter is positioned by means of a hoist at the mounting location, screw the eye bolts into the threads on the top of the inverter and attach the hoist to them. The hoist must be suitable to take the weight of the inverter.
- Make sure that the inverter is stable.
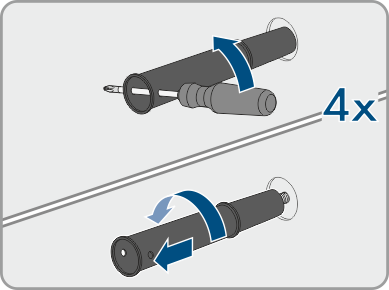
- Remove all 4 transport handles from the threaded holes. If necessary, insert a screwdriver into the holes on the transport handle and use the screwdriver to remove the transport handle.