Mounting the product
Additionally required material (not included in the scope of delivery):
2 stainless steel hexagon head wood screws (AF 10, diameter 6 mm), screw length must be suitable for the support surface and the weight of the product (fastening bracket thickness: 4 mm)
Where necessary, 2 screw anchors suitable for the support surface and the screws
 CAUTION
Risk of injury due to weight of product
Injuries may result if the product is lifted incorrectly or dropped while being transported or mounted.
- Transport and lift the product carefully. Take the weight of the product into account.
- Wear suitable personal protective equipment for all work on the product.
Procedure:
- Mark the position of the drill holes. Align the markings horizontally.
- Drill the holes.
- Insert screw anchors into the drill holes if the support surface requires them.
- Insert the screws until there is at least 6 mm clearance between the screw head and the support surface.
- Hang the product onto the screws using the metal brackets.
- Tighten the screws hand-tight using a ratchet or box wrench. When doing this you can compensate for any misalignment of the drill holes by aligning the metal brackets accordingly.
- Ensure that the product is securely in place.
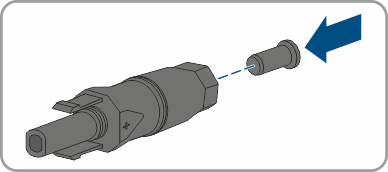
- Seal all unused DC inputs using the DC connectors and sealing plugs as described in the following. When doing so, do not plug the sealing plugs directly into the DC inputs on the inverter.
- For unused DC connectors, push down the clamping bracket and push the swivel nut up to the thread.
- Insert the sealing plug into the DC connector.
- Insert the DC connectors with sealing plugs into the corresponding DC inputs on the inverter.
- The DC connectors snap into place.
- Ensure that the DC connectors with sealing plugs are securely in place.


NOTICE
Damage to the product due to sand, dust and moisture ingress if the DC inputs are not closed
The product is only properly sealed when all unused DC inputs are closed with DC connectors and sealing plugs. Sand, dust and moisture penetration can damage the product and impair its functionality.